Initial set-up
To install Pixel Fixer, simply unzip the file you downloaded into a folder of your choice.
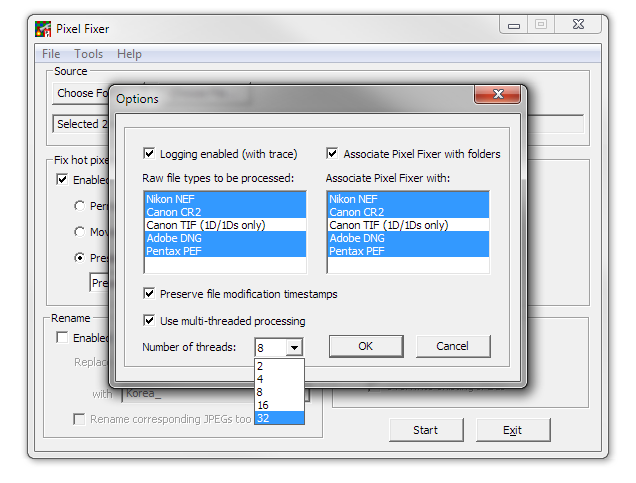
When you run Pixel Fixer for the first time, you should see this options dialog:

Here you can associate Pixel Fixer with folders, or raw files, allowing you to start Pixel Fixer via the right-click menu. The file/folder you right-clicked on will be selected when Pixel Fixer starts.
If you have a multi-core or multi-processor system, enabling multi-threaded processing will reduce the time it takes to process your images.
When you run Pixel Fixer for the first time, you should see this options dialog:

Here you can associate Pixel Fixer with folders, or raw files, allowing you to start Pixel Fixer via the right-click menu. The file/folder you right-clicked on will be selected when Pixel Fixer starts.
If you have a multi-core or multi-processor system, enabling multi-threaded processing will reduce the time it takes to process your images.
Adding a camera, and finding hot pixels
Before Pixel Fixer can remove hot pixels from your images, it needs to know what kind of camera you have and the coordinates of the pixels that need to be mapped out.
This can be done using an automatic process, or you can enter the coordinates manually.
Automatic method
- Set your camera to shoot raw and take a photograph with your lens cap on, using an exposure that is likely to cause hot pixels to appear (e.g. slow shutter speed, high ISO setting).
- Note that if the exposure is very long, some Nikon cameras will automatically remove hot pixels from the image.
- Start Pixel Fixer, and choose "Find hot pixels..." in the File menu.
- Click on "Choose file", and select the NEF file that contains your lens-cap photograph.
- Then you should see a dialog that shows all the hot pixels found in the image, like this:
- You can use the threshold slider to determine how bright a pixel should be before it is considered "hot".
- If you click OK, the camera will be added to the list of known cameras, and the coordinates of the hot pixels will also be recorded.
- If you repeat this process later with the same camera, you'll be given the option of combining the old list of hot pixels with the new list, or you can choose to replace the old list with the new list instead.
Manual method
- First you need to add the camera to Pixel Fixer's list of known cameras. Go into the Tools menu, and choose "Cameras..."
- Click "Add..." and select a NEF file that was created by your camera.
- Your camera should appear in the list.
- To add hot pixels, select the camera, and click "Edit..."
- Click "Add..." to create a new hot pixel.
- Enter the X and Y coordinates of the hot pixel. The exact coordinates may vary slightly depending on your raw converter; refer to readme file included with Pixel Fixer for a more detailed explanation.
If you are having difficulty establishing the exact location of a hot pixel, you can just use the "Find hot pixels" dialog described above to load any image and examine the contents of the raw data at any X/Y coordinate.
If desired, extra criteria can be entered for each hot pixel, so that Pixel Fixer will only map them out in certain circumstances.
Removing hot pixels from your images
Once you've completed the steps above, removing the hot pixels is very simple. All you need to do is:
- Select the source file(s) or folder.
- Choose whether you want the original raw file(s) to be deleted or not.
- Press "Start", and Pixel Fixer will get to work.